Monday, December 9, 2013

How to turn your kids art into a fine art piece for your home.


How to turn your kids art into a fine art piece for your home or give as gifts. 

Okay so we get tons of this kinda stuff because my middle one is a self proclaimed Artist!

Here is a pic of one I have done.  It was a self portrait  (I left it blurred for privacy)  but it basically reads across Name (first and last), 1st Grade (whichever grade) Collection and then Limited Edition.

It's the Limited edition that makes it look like a fine art print. This piece I loved because it really looks like here in my opinion with bow and side pony tail and I loved the colors.  


Here is what you will need:

Photoshop or photo editing software and knowledge of how to use it. 
A digital camera

Ninja skills are good but not needed here. 

Fist take the original outside and get a very good picture of it. Bam! Like that you have just made the art digital.

Load it onto the computer then open it in your favorite photo editing program, 

You will want to open a new document the size you would like your final print, the one shown here is 16x20. (frame from Hobby Lobby) (printed at Sams for 5$)

Drag your piece over to the new document and it will put it onto a new layer. The size it to your liking, here I left a boarder because I wanted to add the title to the piece and the details of name, series, and Limited edition. 


 The pink border you see is really white in my final piece but you can make it any color or size you would like. I like mine thick it resembles a mat that you would find on a fine art piece.


After you get the general idea of how to digitize them you can make books, T shirts, mugs whatever you want. 


Have fun and thanks for reading!

Monday, October 28, 2013

Slideshow at a wedding or for selling images.


How to have a slideshow at the wedding you are photographing. 


I am not a Wedding Photographer I've shot a few but I will always have a second shooter that is a wedding photographer by nature along with me. I love shooting the details and candid moments. Had to get that out of the way LOL.

This wedding I shot, I was thinking before the wedding that while I'm shooting the bride and bridesmaids maybe it would be great to show the bridesmaids and guest the photos from that time. SO...I bought a handy device to load my images onto my IPad and had a little slide show going at the drink table. I received so many compliments about that little slideshow! It truly was the easiest thing I have ever done with photography. I even had someone ask if I would shoot their wedding!

I am not an expert at all things wedding but I was thinking that this could also help at every day shoots. Imagine finishing up a session loading the images onto your IPad then letting the clients choose the ones THEY would want to have edited.  HUH??? I kinda like the idea. Could save some time and then you are sure they will love them because they have already chosen them.

I shot 100 or so images then loaded them while I drove to the next venue and it took all of 10 minutes if that. I was driving so I wasn't really watching when it finished. I literally popped in my camera and said load then started driving. When I got there I unplugged it then started shooting more. Oh and the best part about this I SHOOT RAW!!!! I don't know the technical side if it converts the images to jpeg (my guess) but it loaded beautifully.

The down side to this is that they are all unedited but it does offer you the option to choose the ones you would like included when loading. that took like two minutes. Also a little foot note you will want them all horizontal or all vertical because if not people will be turning their heads to the left or right and that's not a good look.

Image on the right came from here click to read more about what it is. 

I think it was 20$ at Best Buy. Definitely worth the investment. Anyway, have fun with it!

Monday, October 14, 2013

Vivid Color edit

Before and After Edit and How to

I know some of you will like the before and some the after but I wanted to do a short post on how to achieve this edit. I like for some images and I hope you can get something out of it.


Disclaimer: You should be familiar with Photoshop or you will think I'm speaking Greek. ;)

Okay first things first: To create a separation of the subject and the background you do this:
Duplicate your layer~ Filter~Blur~Gaussian Blur~ ( I like it at 10 for this)
add a mast to this layer and erase off of the subjects.

Step two:
Choose Hue and Saturation and lets lift up the Saturation just a bit.

Step Three: Create an S Curve on your curves layer


You could just add the S Curve adjustment if you wanted to like in my example.

* to make it curve you just click on the line and pull it to the desired level. try to make yours look like mine when you do this edit.

For more little tid bits I post updates on my Facebook page click the link to like the page so you can be updated on future post like this one.


Have fun!

Monday, August 12, 2013

The easy Black and White

The simplest way to create a brown or grey tinted image!
I promise its easy! 


Black and White or is it 
Silver and Brown?


 Original 

After both silver and brown


Here are the steps :

 Open an original image in Photoshop

Create a new layer 

use the paint bucket tool to fill the new layer with your favorite color.
Silver, Grey or brown 

Change the blending mode to color and then poof! 
Simple right! I told you it would be! 


Just Grey option 

Just brown option 


The colors I chose was one Grey # 8b8a88  and one Brown # 877c67

I use this also with a pink sometimes for pink skin tones and over all pink airy feeling. 

Have fun with it. make tones of layer and change the opacity of some. 

Pinterest success post number 1

We've all seen those Pinterest Fails right?
Well this one is a success! 

See the bedazzled candle on my daughters cake? This was a Pinterest post that my niece adapted. I thought it came out so good I wanted to blog a little and let everyone know that this one is do-able! 


This is the original from Pinterest! See the original link below 


The original blog post is Dollar Store Crafts
I love this site btw, the dollar store is full of treasures!


The party was at Chuck E Cheese here are few of my favorite pics from the day. 


Thursday, August 8, 2013

The Accountant's Son

The Accountants Son

This photo took 3 years, okay not really but in a way, let me explain a little or a lot. 


For those who don't know us personally start reading here:
I have three children, My husband has one. When I met him I had my two girls and he immediately fell in love with them and welcomed them with opened arms. My husband had wanted a big family for many years and had in his words "had given up on the idea thinking it just wasn't meant to be".  I on the other had was done with having kids because basically its not for sissy's. Its a lot of work! A LOT of work.  
Over lunch one day my husband told me how for years he has dreamed of a little guy to toss a football with and to coach in a baseball league.  I began to realize that by choosing to marry me and loving my girls I have robbed him of having a child of his own. So I agreed to have another kiddo knowing what was in store for me, or so I thought. 
Shortly after we were pregnant. This pregancy was way worse than I remembered. I was exhausted to the point of being couch and bed ridden. It was like nothing I had experienced with my girls. I had pain and cramps and just kept saying I felt like something was wrong it just didn't feel right. As you can imagine something was wrong. We lost that baby and it was like my heart ripped and all the feelings of confusion and doubt came in. Did I cause this because I didn't originally want to be pregnant and go though all this again, did we force this and is this not God's will or plan for us. 
All of those thoughts and deep deep sadness came over us. 
We did a lot of praying and we did a lot of talking and decided we would not try again. 
Months passed and my husband and I decided to just have "the procedure". The conversation went like this. Me: its time you made the appointment. Him: yep your right, I'll call tomorrow. 
Tomorrow came and I was talking to my niece who had recently found out she was pregnant. She was telling me how she was feeling, all the symptoms (i'll spare you the details) and I laughed and said I feel like that too and I'm not pregnant. She said "I wish you were. Go take a test I bet you are, I hope you are."  We hung up with each other and I couldn't stop thinking about what she said. I had old test from the previous pregnancy so I said well if I have symptoms I should just check. 
Obviously the test was positive my husband was stunned and had mixed feelings, we both did actually,  as we had come to terms with a two child household. He's an Accountant and thinks in practicalities  and numbers and this was going to change our bottom line.

Those who do know us personally start reading here:
When we found out we were having a boy I immediately thought of photos with baseballs and footballs. Then when he was born He looks so much like my Husband that I knew I had to take a photo of our little Marshmallow for Daddy's office. So here they are! I hope you like them!


In the south you will sometimes have strangers (mostly older people) ask to take your baby, not sure where this started but when people ask if they can have him, I always say "Nope, I worked too hard for this one. " 


Okay Photography talk now. ( bet you thought I wouldn't get around to that)  I shot this in my garage. I used a board I purchased some time ago from Home Depot and covered it in Ledger Paper.  I had to ask if there was a kind of paper just accountants use. Luckily for me there was! The floor was purchased on Etsy some time ago. The Glasses are from Build a Bear! They do have lenses in them so you do have to watch out for the glare but if you move around a bit you can a photo without one. 

All in all the images took about 5 minutes to snap as marshmallow is very used to mom taking photos of him and he just kinda looks around. 

Needless to say, the entire Accounting Department at his building is in love with these photos. I have to say , I think they are super super cute!

Shot at ISO 800 (with one softbox) Garage door open on the side) 1/400 sec with my 50mm at 3.5 I could have taken my ISO down a bit but I don't get much noise with my  Canon 5D Mark iii. 

Wednesday, June 5, 2013

Circus - Lafayette, LA Photographer

 If I Ran the Circus!

If you know anything about Jessica Wirtz it is that I LOVE a stylized shoot! When this mom contacted me for photos and said they had put together some outfits for a Circus themed photo I jumped at the chance to photograph it! I usually have to do all the prop work but these super creative moms got together and I have to say, they are talented for sure!
 How perfect is the book and the mustache and the hat... oh its just all so darn cute! 


Poor baby elephant LOL!


Tuesday, April 30, 2013

Dr. Seuss Themed Cake Smash


Dr. Seuss themed Cake Smash. We kept it simple with jeans a bow tie I made with a bit of elastic and a sheet of stiff felt I picked up at Hobby Lobby. 


After the Cake Smash we hit the tub and got loads of smiles so i wanted to share these images too. He has itty bitty teeth! So stinkin cute!


Monday, April 22, 2013

Dream a Little, Lafayette LA Photographer

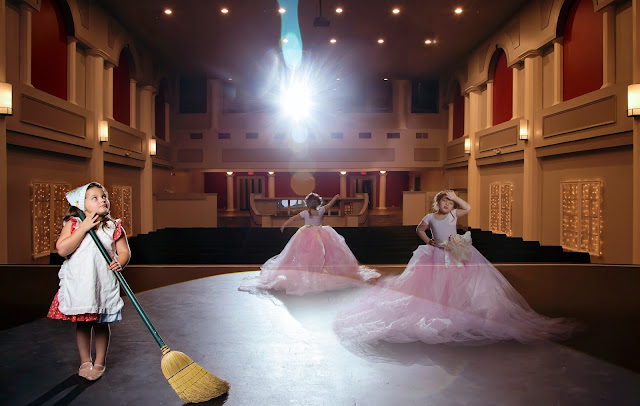
 Dream a little! 

A tribute to a wonderfully special little theater girl. 

Okay the idea was simple get a theater. Called the Delta Grand Theater they said sure! Done, now what? Now I had to come up with a way to make it special. That's when I had the idea that a kid daydreaming of being a star is really the only way to show case her dreams and the things she loves most. Once I had the idea everything else sort of fell into place. 

I can't think of a better way to celebrate the life of a kid than to capture who they are what they love. 


Saturday, April 20, 2013

Berry picking mini Lafayette, La Photography

BERRYLICIOUS

Have you ever gone out to pick fresh fruit from a You Pick it farm? One of my fondest family vacations included a stop at a peach farm and last year I took my kids to a Blueberry you pick it and they enjoyed it so much I thought we could offer this as a photo mini session. 

This is one of those moments when you want to be present and in the moment and experience with your kids or grandkids the amazement and wonder of them picking their own food! I personally had to tell my then three year old " yes you can eat it " over and over again it was like she didn't believe me! 


Okay now to the what should I wear to this thing, Well you will want to be comfortable so shorts t-shirt I saw this cute little shirt (perfume yourself with bug spray, remember this is South Louisiana)


This would make for a more vintage feel in your images 


also for a brighter more current 


And for another option 


the dress featured above is handmade and fromMeMaws in Lafayette LA
like them on facebook here!

remember to contact us if you would like to be included in this mini

by email


Don't forget to like us on facebook for more info about this mini and other things we are up to.